| « Ghostbusters PDF eBook Preservation Project - Ghostbusters: The Return, Real Ghostbusters Toy Booklets, And More! | What's On The Menu At WienerWald » |
Ghostbusters The Video Game Unlockable Art Galleries
The realistic version of Ghostbusters: The Video Game contains art galleries which are unlocked as you progress through the game. Now on Spook Central you can view and/or download every single one of these 287 unlockable images. This also includes a few images that are NOT shown in the game, including the entire Thanksgiving Day Parade gallery from the deleted level.
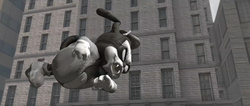
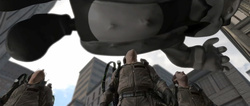
For the first time anywhere, Spook Central is proud to present the lost (but not anymore) Thanksgiving Day Parade art gallery featuring that level's big boss: Blinkers, the Science Pup! You remember Blinkers, right? We saw him oh so briefly in the "Atari Live Trailer" from December 3, 2008 (stills below). Well, now you can see his concept art, as well as storyboards from his pre-fight cutscene (in the Miscellaneous gallery), and the rough cut video of that pre-fight cutscene! Also, it would seem that at one point in the parade level the player would have traversed through Ray's Occult Books, as there is concept art for it in that gallery, and a few concepts of jars that would have been on the shelves in the Miscellaneous section.
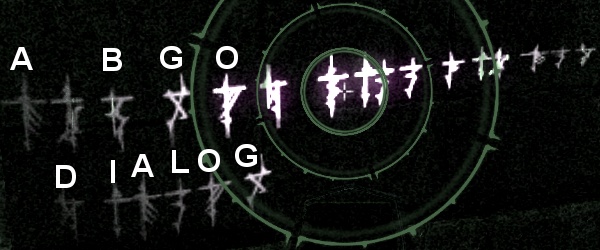
But that's not all! In addition to the parade gallery, there are a few hidden images in the other galleries, too. The images are there in the PC game's assets, but they're not shown in the galleries inside the game itself. One of these hidden images is the key to the Gozerian Alphabet in the Miscellaneous gallery. You can use it to decipher all of the hidden symbols seen here and there throughout the game (equip the PKE Meter in the Crypt Alley section of the cemetery to see some writing on the walls) and on some of the concept art. I tried it on some of the hidden Crypt Alley writing, but I couldn't get a clear enough shot to decipher more than a word and a few letters (which may be incorrect).
TECHNICAL GARGON NOW STARTS
Here's where I now go into detail as to how I got these art gallery images out of the PC game assets and put them into the form you see on the website. If you're not interested in this information, you can stop reading now and go check out the art galleries.
All of these images are stored in the file w32art02.pod in the art\ui\tiles\ directory, with the thumbnails stored in the art\ui\thumbs directory. You can safely ignore the thumbnails, though a few thumbnails are also found in the tiles directory (they can be deleted). In each are the subdirectories: cemetery, hotel, hotelreturn, library, lostisland, misc, museum, parade, and timessquare. The images are stored as .tex files, with each image broken up into several parts ("tiles"). The game stores all of its textures and other image assets as .tex files, so the first three steps listed below can be used for any of the .tex files in the game. The programs mentioned in Steps 1-3 can be found on the PC Gaming page here on Spook Central.
1. Use Dragon Unpacker to get the .tex files out of the .pod file.
2. Convert from .tex to .dds using the Ghostbusters TEX Converter.
3. Convert from .dds to lossless .bmp or .png using DDS Converter.
At this point we would have done everything necessary for the majority of the game's .tex files. You could then edit them in any image editor and then convert them to .jpg, .gif, or .png for the final file to be uploaded. With the unlockable art gallery images we have to do one more step because they are not stored as singular images.
You see, the art images are stored as 512x512 pixel pieces ("tiles"), which will need to be reassembled into single images. The file names give you a clue as to which part of the image it is. Anything with an "a" near the end is in the 1st row of the image, a "b" is the 2nd row, and so on. The numbers at the end tell you what column that part is in. A file with "b03" at the end of the filename is in the 2nd row, 3rd column.
For example "char_gravegollem001" contains 16 parts, in 4 rows and 4 columns.
Row 1: char_gravegollem001_a01.tex through char_gravegollem001_a04.tex
Row 2: char_gravegollem001_b01.tex through char_gravegollem001_b04.tex
Row 3: char_gravegollem001_c01.tex through char_gravegollem001_c04.tex
Row 4: char_gravegollem001_d01.tex through char_gravegollem001_d04.tex
Piece them together that way and you'll get the full-size image. Follow this methodology for the rest of the images, though not all of them are prefect squares like this example.
4. Piece together the parts of each individual image one at a time using GlueIt v1.06 (requires .NET Framework v2.0).
When you run GlueIt, you will see a clean interface with four clearly defined steps. You need to run these steps on each set of image parts ONE AT A TIME! With 287 total complete images, this means you'll be doing this 287 times. Step 1 is simple: just open the image parts you want to glue together. Make sure they're listed in order. The easiest way to do that is to select them from the last one to the first in the file open dialog box; using Shift+Arrow Keys to highlight them all. Under Step 2 you'll need to put in the number of columns, which varies per image set, but is always easily determined by looking at the highest number at the end of the filenames. In the above example of "char_gravegollem001", you'll notice the numbering goes up to "04", so that means that there are 4 columns in that image. After typing in "4" in the Number of Columns field, press the big "GlueIt" button. A preview window will pop up, but since there are no scrollbars in it, you probably won't be able to see the entire glued image, rendering the preview rather useless. Ignore "Step 3 - Preview" as it doesn't really show you the glued image all that well. Move on to Step 4, where you select the output format (.bmp, .png, or .jpg) for the reassembled image, and save it where every you want. Now press the "Clear" button under Step 1 and start all over again on the next set of image pieces.
5. (OPTIONAL) In your favorite image editor, crop the excess blackness from each image (you'll have to do it one-by-one as the amount of blackness differs per image) and when you're satisfied with the final image, save it to .jpg or .png (or .gif for some of the images with lesser colors, if you want).
That's all there is to it. It may not seem like a lot of work - only five easy steps - but since Steps 4 and 5 have do be done on a per image basis, can't be automated, and there are almost 300 images, it gets to be quite the task. So with that in mind, if you want to use any of my converted and reassembled art gallery images on your site, you are free to use a few of them (no more than 20 across all galleries), but please give me credit and a link. The source material may be a PC video game that a lot of people own and could extract the images from themselves, but it took a helluva lot of work to get them looking as nice and neat as you see on this site, and I doubt that anyone else is going to bother to do all of that work themselves when I've already done it for everyone, so a little credit isn't too much to ask.
For the first time anywhere, Spook Central is proud to present the lost (but not anymore) Thanksgiving Day Parade art gallery featuring that level's big boss: Blinkers, the Science Pup! You remember Blinkers, right? We saw him oh so briefly in the "Atari Live Trailer" from December 3, 2008 (stills below). Well, now you can see his concept art, as well as storyboards from his pre-fight cutscene (in the Miscellaneous gallery), and the rough cut video of that pre-fight cutscene! Also, it would seem that at one point in the parade level the player would have traversed through Ray's Occult Books, as there is concept art for it in that gallery, and a few concepts of jars that would have been on the shelves in the Miscellaneous section.
But that's not all! In addition to the parade gallery, there are a few hidden images in the other galleries, too. The images are there in the PC game's assets, but they're not shown in the galleries inside the game itself. One of these hidden images is the key to the Gozerian Alphabet in the Miscellaneous gallery. You can use it to decipher all of the hidden symbols seen here and there throughout the game (equip the PKE Meter in the Crypt Alley section of the cemetery to see some writing on the walls) and on some of the concept art. I tried it on some of the hidden Crypt Alley writing, but I couldn't get a clear enough shot to decipher more than a word and a few letters (which may be incorrect).

TECHNICAL GARGON NOW STARTS
Here's where I now go into detail as to how I got these art gallery images out of the PC game assets and put them into the form you see on the website. If you're not interested in this information, you can stop reading now and go check out the art galleries.
All of these images are stored in the file w32art02.pod in the art\ui\tiles\ directory, with the thumbnails stored in the art\ui\thumbs directory. You can safely ignore the thumbnails, though a few thumbnails are also found in the tiles directory (they can be deleted). In each are the subdirectories: cemetery, hotel, hotelreturn, library, lostisland, misc, museum, parade, and timessquare. The images are stored as .tex files, with each image broken up into several parts ("tiles"). The game stores all of its textures and other image assets as .tex files, so the first three steps listed below can be used for any of the .tex files in the game. The programs mentioned in Steps 1-3 can be found on the PC Gaming page here on Spook Central.
1. Use Dragon Unpacker to get the .tex files out of the .pod file.
2. Convert from .tex to .dds using the Ghostbusters TEX Converter.
3. Convert from .dds to lossless .bmp or .png using DDS Converter.
At this point we would have done everything necessary for the majority of the game's .tex files. You could then edit them in any image editor and then convert them to .jpg, .gif, or .png for the final file to be uploaded. With the unlockable art gallery images we have to do one more step because they are not stored as singular images.
You see, the art images are stored as 512x512 pixel pieces ("tiles"), which will need to be reassembled into single images. The file names give you a clue as to which part of the image it is. Anything with an "a" near the end is in the 1st row of the image, a "b" is the 2nd row, and so on. The numbers at the end tell you what column that part is in. A file with "b03" at the end of the filename is in the 2nd row, 3rd column.
For example "char_gravegollem001" contains 16 parts, in 4 rows and 4 columns.
Row 1: char_gravegollem001_a01.tex through char_gravegollem001_a04.tex
Row 2: char_gravegollem001_b01.tex through char_gravegollem001_b04.tex
Row 3: char_gravegollem001_c01.tex through char_gravegollem001_c04.tex
Row 4: char_gravegollem001_d01.tex through char_gravegollem001_d04.tex
Piece them together that way and you'll get the full-size image. Follow this methodology for the rest of the images, though not all of them are prefect squares like this example.
4. Piece together the parts of each individual image one at a time using GlueIt v1.06 (requires .NET Framework v2.0).
When you run GlueIt, you will see a clean interface with four clearly defined steps. You need to run these steps on each set of image parts ONE AT A TIME! With 287 total complete images, this means you'll be doing this 287 times. Step 1 is simple: just open the image parts you want to glue together. Make sure they're listed in order. The easiest way to do that is to select them from the last one to the first in the file open dialog box; using Shift+Arrow Keys to highlight them all. Under Step 2 you'll need to put in the number of columns, which varies per image set, but is always easily determined by looking at the highest number at the end of the filenames. In the above example of "char_gravegollem001", you'll notice the numbering goes up to "04", so that means that there are 4 columns in that image. After typing in "4" in the Number of Columns field, press the big "GlueIt" button. A preview window will pop up, but since there are no scrollbars in it, you probably won't be able to see the entire glued image, rendering the preview rather useless. Ignore "Step 3 - Preview" as it doesn't really show you the glued image all that well. Move on to Step 4, where you select the output format (.bmp, .png, or .jpg) for the reassembled image, and save it where every you want. Now press the "Clear" button under Step 1 and start all over again on the next set of image pieces.
5. (OPTIONAL) In your favorite image editor, crop the excess blackness from each image (you'll have to do it one-by-one as the amount of blackness differs per image) and when you're satisfied with the final image, save it to .jpg or .png (or .gif for some of the images with lesser colors, if you want).
That's all there is to it. It may not seem like a lot of work - only five easy steps - but since Steps 4 and 5 have do be done on a per image basis, can't be automated, and there are almost 300 images, it gets to be quite the task. So with that in mind, if you want to use any of my converted and reassembled art gallery images on your site, you are free to use a few of them (no more than 20 across all galleries), but please give me credit and a link. The source material may be a PC video game that a lot of people own and could extract the images from themselves, but it took a helluva lot of work to get them looking as nice and neat as you see on this site, and I doubt that anyone else is going to bother to do all of that work themselves when I've already done it for everyone, so a little credit isn't too much to ask.
3 comments
WHOA, COOL! Excellent finds, Paul. Especially the cutting room floor image of Ray’s Occult! That’s sweet it was going to appear aside from the one answering machine message about it.
Feb. 10, 2012 @ 01:38
Thx for the hard work ! This is why Spook Central is my favorite Ghostbusters site !
Feb. 23, 2012 @ 19:34
Leave a comment
Search (Articles Only)
Categories



(Ghostbusters Amazon Store)

Please be aware that as an Amazon Associate, I earn a very tiny commission from purchases made though the Amazon links on this site.
|
COMMUNITY LINKS
NEWS • Ghostbusters Wiki • GB News • GB Fans • Ghostbusters Mania • GB Reboot Facebook • Proton Charging News Archive FORUMS • GB Fans • EctoZone OFFICIAL • Ghost Corps Facebook • Ghostbusters Facebook • Ghostbusters YouTube • Ghostbusters.com |
[ MORE TRIBUTES ]

( MY COMPARISON REVIEW )
( AVOID SHIPPINGEASY/STAMPS.COM )
U.S. eBay (Ghostbusters stuff)
U.K. eBay (Ghostbusters stuff)
