How To Format / Unlock / Delete A Clickfree External Portable USB Hard Drive CDFS Partition
By Paul Rudoff on Jun. 23, 2020 at 3:27 PM in Public Service Articles
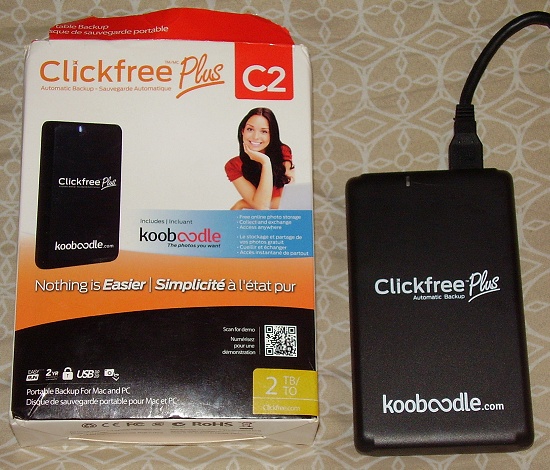
On Saturday June 20, 2020, I bought an open-box unused Clickfree Plus C2 2-Terabyte USB 3.0 external portable hard drive at a yard sale for the whopping sum of $2.00. (The drive has a model number of CA3C20-2CBK9-F2S and a UPC number of 817048015947, and based on the copyright date on the bottom of the box, it was manufactured in 2014 by Storage Appliance Corporation.) I had never heard of the Clickfree brand before, but I could not pass up buying a 2TB hard drive for two bucks. The box heavily promoted the product's easy automatic backup feature, but I figured that was just some software on the drive that I could easily delete. How wrong I was...
You see, the thing I quickly learned about this drive is that is doesn't work like any other external USB hard drive. With other drives, you plug them into your computer, Windows recognizes it as a hard drive and installs the drivers, and then you can immediately copy files onto it from any program. Storage Appliance Corporation didn't want people to be able to use their Clickfree drives like normal hard drives. They wanted to force users to use their included "easy automatic backup" software. That's great for computer newbies, I guess, but not for the rest of us.
They accomplished this by having the drive trick Windows into thinking that's it's a CD-ROM drive by showing a CDFS partition as the primary data storage on the drive. Due to this, you will not be able to re-partition the drive because that read-only CDFS partition isn't a "hard drive", but rather a "CD-ROM drive", and thus won't be seen by any Windows partition programs. (Maybe it can be re-partitioned in DOS, but I never tried.)
I jumped online to find information on how to "unlock" this drive and convert it into a normal drive. There were a few forum posts, all of which said to use Window's own DISKPART utliity. Although replies said that that worked, I see no possible way that it would since Windows sees the Clickfree drive as a "CD-ROM drive" and NOT as a "hard drive". Windows won't change the partition on a CD-ROM drive because a real CD-ROM drive itself is not writable storage (the blank discs you put in it are the writable storage). Sure, enough, DISKPART didn't list the Clickfree drive.
Thankfully, I found an old Windows Secrets forum post (now Ask Woody) written by Hayel2ko on January 29, 2012 at 4:24 pm. The post, which is reprinted below with a couple of additions and corrections from me, gives detailed instructions on how to re-flash the hard drive so that Windows can see it as a hard drive and not as a CD-ROM drive.
THIS ONLY WORKS FOR CERTAIN CLICKFREE DRIVES. IT WILL NOT WORK FOR ALL OF THEM! DO NOT E-MAIL ME ASKING FOR HELP. I DID NOT WRITE THIS INFORMATION AND I HAVE ONLY DONE THIS ONCE WITH THE ONE SPECIFIC DRIVE NOTED AT THE TOP OF THIS ARTICLE.
Gparted and other third-party Windows partitioning software, such as EaseUs and Partition Magic, WILL NOT WORK!!!!!!!! These software programs will not work because the CDFS partition is in a write protected chip (NAND) and it is impossible to erase. THIS MEANS THE HARD DRIVE HAS NOTHING TO DO WITH THIS!
Before proceeding with removing the CDFS Partition, I will not take any responsibility of whatever happens, IT IS ALL ON YOU!!!!!!!!! YOU WERE WARNED
THIS METHOD IS GOING TO TURN YOUR HARD DRIVE TO A RAW FORMAT AND THAT MEANS YOUR DATA WILL BE GONE SO PLEASE BACKUP THE DATA ON YOUR COMPUTER
The PRO about this fix is that the CDFS will be removed and the CON is that the LED FROM THE EXTERNAL HARD DRIVE WILL NOT WORK (THE HARD DRIVE IS STILL FUNCTIONAL). I DO NOT KNOW WHY THIS HAPPENS. IF YOU CARE ABOUT THE FLASHING LIGHT, DO NOT PROCEED WITH THIS FIX!
IF YOU ARE AN EXTREME RISK TAKER OR REALLY DESPERATE, PROCEED WITH THE FIX, BUT I STRONGLY RECOMMEND THAT YOU RETURN THE HARD DRIVE AND BUY A GENERIC EXTERNAL HARD DRIVE!
1. Download the JMS-539/551 Series controllers USB2/3 & Sata Firmwares - Version 255.31.3.41.22 (517 Mb, self-extracting 7zip). (This file can also be downloaded from the Internet Archive, and was originally available on Station-Drivers.com.)
2. Extract the file to a folder. (Recommended that you make one)
3. Go to your folder where you extracted the files and run the FwUpdateTool. There are two versions included: "FwUpdateTool_v1_16_00_T2.exe" and "FwUpdateTool_v1_17_06.exe". I don't think it matters which one you use, but I went with the newer one (v1.17.06).
4. In the FwUpdateTool program, select the Clickfree backup drive next to USB DISK.
5. If you see JMS539 next to "Chip", keep proceeding with the steps. IF YOU SEE SOMETHING ELSE, DO NOT PROCEED WITH THE STEP OTHERWISE YOU WILL BRICK YOUR EXTERNAL HARD DRIVE.
6. Select the firmware file by clicking load file and selecting the "JMS539_PM_255.31.3.41.22.BIN" file from the ones you extracted. The other two files ("JMS551_v31.0.6.0.13_SleepMode.BIN" and "JMS551_v31.8.6.0.13_NoSleepMode.BIN") are likely for the JMS551 chipset, and should be ignored.
6A. AGAIN, I WILL NOT TAKE ANY RESPONSIBILITY OF WHAT EVER HAPPENS TO YOUR EXTERNAL HARD DRIVE AND AGAIN IT IS ALL ON YOU.
7. Click on Run, and when it says Programming Succeed (or something like that), disconnect the Clickfree hard drive and re-connect it.
NOTE: Even though the FwUpdateTool program said that my 2TB drive had the JMS539 chipset, it said that the firmware file did not match the chip, which caused me great worry. Then I remembered that I only spent TWO DOLLARS on the drive, so if I ended up bricking it, I would not have been at much of a loss. I proceeded anyway, and got the message saying that it was successful.
7A. So what we did with the Clickfree Hard Drive is that we programmed the JMS539 Bridge controller to bridge the connection directly to the hard drive and not to the Nand Chip that carries the CDFS partition.
8. Now go to device manager (Start -> Control Panel -> Device Manager) and if you see another hard drive that you never saw before, you finished Part I of this method.
NOTE: When I re-plugged the 2TB drive back in, Windows recognized it as a "TOSHIBA MQ01ABB200 USB Device" in Device Manager -> Disc Drives.
9. Now for Part II. If you don't see the external hard drive on Computer or My Computer, DO NOT PANIC. This is because your External Hard Drive is not formatted and doesn't have a drive letter.
10. What I strongly recommend for formatting an external hard drive is to use a Linux Distro, GParted. However, if you want to use a third-party formatting tool or use disk management, you can proceed with that. If you want to use my recommendation, here is the link to the iso. Click on the Live CD/USB tab to guide you putting the iso on a cd or usb.
NOTE: Although I already have a copy of Gparted, I just rebooted using my copy of the Hirem Boot Disc and then re-formatted/re-partitioned the drive using the Disc Genius program that's on it.
11. I will not provide steps on how to boot the cd/usb and how to format the Clickfree hard drive.
12. After you formatted the external hard drive, you are officially done.
For users that didn't get JMS539 next to "Chip", you will have to open the external hard drive enclosure and find the sata controller chip, write down the model number and use that to find yourself a solution because you can't always depend on the internet on something like this. You have to start doing things by yourself, and again, it's not my responsibility if you screw up your external hard drive.
Don't expect to get any help from Storage Appliance Corporation. They seem to be out of business, since the Clickfree.com website, and the Storage-Corp.com company website, both point to something else entirely. The Clickfree Twitter account hasn't been updated since 2013, which is another sign that they are no more. Even if they were in business, I can't imagine them helping anyone defeat their own "copy-protection scheme".
Anyway, at this point in time, I would really suggest that unless you find one of these Clickfree drives for less than five Dollars, don't bother buying one - assuming you don't want the automatic backup feature, that is. You're taking a BIG chance on whether it's a drive that can be unlocked or not using the above technique, and a regular Toshiba 2TB external portable hard drive isn't very expensive these days, so why go through all of this Clickfree hassle if you don't have to? :-)
[UPDATE - 7/8/2025]
As of June 2025, Windows would not properly read the drive when plugged into the USB 3.0 port. It would list the drive, but not see the partition with the files on it. There would be no capacity listed and all of that. I don't remember if I ever got it to successfully be read by the 3.0 port before, as I tended to only use the 2.0 ports due to the old version of Windows I was using prior. If I plug it into a 2.0 port, Windows will read it properly, but file transfers are very slow.
I use the drive to copy large videos files onto. I then plug it into my television's USB port and watch the movies on my big screen. There was never a problem doing that for the past five years. Yesterday, July 7th, it could no longer be read at all by my television! No matter how many times I unplugged and re-plugged it back in, the TV never added it to the Sources list.
At this point, I just gave up and bought the Toshiba HDTP320XK3AA 2TB USB3.0 Canvio-Ready External Portable Hard Drive for $75 with free shipping. I can't say that I feel cheated as I only spent $2 on this Clickfree drive and I got five years of use out of it. Just don't expect any real long-term usage if you can unlock the Clickfree drive using the information in this article.
4 comments
I have the same problem with a 320GB version. The JMS software didn’t recognize the CD drive. It stated non WD Hard drive.
So I decided to scrap the case and controller (where the partition resides) and pull out the HD. A new controller case on Amazon is $8.
Problem solved. My drive was given to me, but your investment will now total $10 for an external 2TB hard drive.
Not bad…
I bought a ClickFree 16GB drive off the web, it’s brand new, model FL160 (yes, I know it’s tiny, and, yes, I know it’s fairly old technology, but the storage capacity and the size of the drive and the portability suit my requirements perfectly. Is there an easy way to “disable” the backup capability so it can be used as just a 16GB USB drive alone, without having the thing go straight into its backup operation automatically and having to tell it to ignore doing so?
It’s people like you that make the internet great!
It worked beautifully. Thank you so much.
found a 1TB model at a goodwill for $4, did this method and now it is working fine, thanks.
Leave a comment
| « The Ultimate Scream Collection DVD Booklet | The Hunt Blu-ray + DVD Combo Pack Review » |

